| Quantity | Description |
|---|---|
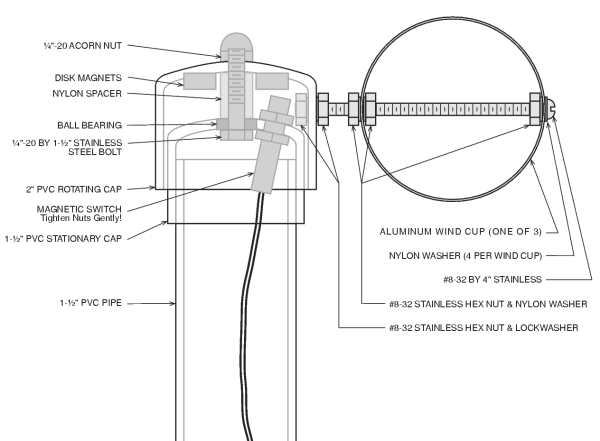
| 3 | Aluminum wind cups, 2.5" (63.5mm) diameter (weight matched set) |
| 1 | Magnetic reed switch 1.5" (38.1mm) long, 5/16"-24 with hex nuts |
| 2 | Magnets, 1/2" (12.7mm) diameter (epoxied into 2" PVC cap) |
| 1 | Nylon Spacer, 1/2" (12.7mm) OD, 0.25" (6.35mm) ID, 1" (25.4mm) long |
| 1 | PVC cap, 2" schedule 40 pipe (precision drilled and tapped) |
| 1 | PVC cap, 1.5" schedule 40 pipe (precision drilled) |
| 12 | #8 nylon washers (UV resistant) |
| 1 | Ball bearing, 1/4" (6.35mm) ID, 3/4" (19mm) OD, shielded (epoxied into 1.5" PVC cap) |
| 1 | 1/4"-20 cap screw (bolt), 1.75" long, stainless steel |
| 1 | 1/4"-20 acorn nut, stainless steel |
| 2 | Custom spacer (washer), 0.355" OD, 0.260" ID, 0.040" thick, stainless steel |
| 3 | #8-32 machine screw, 4" long, stainless steel |
| 15 | #8-32 hex nut, stainless steel |
| 6 | #8 internal tooth lock washer, stainless steel |
| 1 | Loctite #222 thread locker packet |
| 1 | RJ-45 connector board soldered to magnetic switch |
| 2 | #6-32 machine screw, 1/4" long |
| 2 | Spacer, #6-32 female, 1/4" Hex, 0.75" long, Aluminum (pre-pressed into 1/5" PVC cap) |
| 1 | PVC pipe, 1.5" trade size, 5" long |
If the wind cups are oriented on the 2" cap so that the cap rotates clockwise (when viewed from above) the tendency will be for the cap screw to tighten on the mounting bolt (rather than unscrewing). We recommend this orientation.
Caution: tightening with too much force bends the plastic switch case and may crack the glass ampule enclosing the magnetic switch contacts.